Date | Skills/ Knowledge | How it can help |
22/09/11 | The Stage This is the blank canvas which appears when Adobe Flash is opened. This is where the creation of the animation happens. Symbols and contents are imported onto the ‘stage’ and the animation process happens. This process includes: importing symbol, selecting key frames, final animation position and creating animation. | Knowing what the ‘stage’ is used for has helped me. As I needed to know what happens when the symbols are imported and how I create the animation within it. |
Text Tool: Used to create text within the document, the font used can be changed within ‘Text’ button located at the top of the page. Hand Tool: This tool is used to move ‘the stage’, which is the blank background which is within Flash for animation to be built. This moves the whole stage including all of its contents. Pen Tool: This creates a path for drawings to be created. Free Transform Tool: This tool is used to enlarge and rotate graphics within Flash, Pencil Tool: This tool is used for the person to draw freehand within Flash. The toolbar is essential within Adobe Flash, other tools which are included are: Lasso Tool, Shape Tool, Zoom Tool and Eraser tool. I am now familiar with the tools within the toolbar and when I come to creating my animation I am clear of the different tools and their purposes. | By looking at the toolbar and becoming familiar with the toolbar I will be able to use the tools within it easily when it comes to creating my animation within Flash. I am familiar with the layout of these tools and their purposes, so I will be able to apply and use these tools correctly to help create my animation. | |
| 22/09/11 | 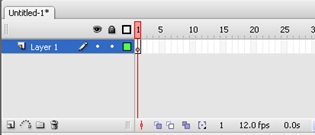 The timeline is important, as it shows the progression of the animation. You are able to create an animation by using ‘motion animation’ by selecting the first and last frame within the animation. The timeline with Flash shows various contents, these include: · Frames: Within the timeline the frames are clearly numbered. They are numbered in groups of 5’s which makes creating an animation easier. If I created an animation it would be easier for me to select 20, 25 or 30 frames as this is clearly marked for me. The amount of frames which you want within the animation can be chosen along this timeline. · Frame Rates: The frame rate is shown along the bottom of this sections, it is shown as 12.0 fps. This can be changed, higher or lower, the frame rate determines the speed of the animation. The higher the frame rate, the faster the animation. | By viewing the timeline I am now familiar with the different aspects and contents within it. Including the frames and the frame rates. I understand how the timeline is used to create an animation, which will help me when I start to create my animation. |
| 22/09/11 | Key Frames  | The way in which I would use this tool within Flash is for the creation of the animation. This includes selecting the start and end frame and selecting ‘Motion Tween’ button (located on the bottom panel) to create the animation. This is an easier way of creating an animation. By stating the start and end position and start and end frame, the animation will be created automatically. |
| 22/09/11 | This panel is located to the right of the ‘stage’. This panel controls the different colours which are used for the different contents within the ‘stage’ and animation. Similar to Photoshop, a symbol is selected and the colour can be changed by choosing a colour from this palette.  | I will use this tool to select different colours which I want to use throughout my animation. |
| 22/09/11 | This is a panel which is used for the artist to keep a folder of colours which they will keep using. For example, if there was a certain shade of red I particularly wanted to use again on a different part of the animation, I could create a swatch and keep this red for future use.  | This tool will really help me in future projects within Flash. This is because I will be able to store the colours which I use regularly and keep for future use. This could be on one particular object. In the past in Photoshop I have had a certain colour and not been able to find the exact match again. Therefore this tool will really help in terms of storing colours. |
| 22/09/11 | Library Panel This tool stores the items which you are working on. This panel is placed to the right of the screen and the ‘stage’. This stores the different objects being worked on. When a symbol is imported and edited, it will be stored within this library panel. When the symbol is ready to be put on the ‘stage’ it will appear visually in this panel and can be dragged over onto the ‘stage’.  | By looking at the library panel I have understood what contents are placed here and how they are stored. This will therefore help me when I am using Flash to create my animation. As this is the place where the symbols and items will be stored ready to be imported onto the ‘stage’. |
29/09/11 | Inserting new symbol into Adobe Flash. To start an animation I inserted a new symbol, by Insert-New Symbol. I then selected Graphic from the type and named this symbol. Different types of files can be imported, these are Movie Clip, Button and Graphic, and for most of my animation I will be importing Graphic.   | I will be using this tool throughout the process of creating an animation. By inserting a new symbol I can import different type of files into Adobe Flash. |
29/09/11 |  Drawing a shape Once I had inserted the symbol, I drew the shape. To insert a shape I selected the shape tool in the tool bar. I then selected the Oval shape tool from this tool bar, I then right clicked on the ‘drawing pad’ screen and created the shape. I added a colour to this shape by selecting the colour in the colour palette. I then repeated this process to create another circle within the circle; I can then see the ball rotate when animated.  | This tool in the tool bar will help me when creating animation in Flash. This is because I can use all of the different shape tools when creating my animation. |
20/09/11 | This is a panel located below the timeline at the top of the page. This shows the ‘stage’ (scene 1) and ‘drawing area’ (Ball), the stage is where the animation is created. The symbol next to this on the panel shows the symbols in the library panel (located at the right hand side of the screen). By clicking these icons I can view the different elements within Adobe Flash. These being the stage and the symbols which are imported into the stage.  | I will use this panel to view the different symbols within Flash. I will be able to make changes to the symbols to import them into the stage. I can also view the stage to see the progress of my animation. |
29/09/11 | These are the timelines which create the animation. The timeline consists of keyframes, which make the animation. The first keyframe is always selected and is created as a keyframe.  | I will use the timeline to help create the animation, whether it is frame by frame animation or tween motion animation. This will show the development of the animation and is used to create the animation. |
29/09/11 |  Ball in ‘Library’- drag onto stage | I will use this set up throughout the process of creating my animation. This allows me to organise the different elements which are included within the process of creating my animation. Then to finally import them into the stage to build the animation. |
29/09/11 |  Selecting keyframe- first and last 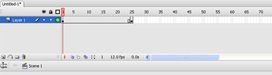 I have now positioned the symbol in the first position I selected and inserted a keyframe at frame 25. This is the length of the animation (how many frames included). I have now positioned the symbol in the first position I selected and inserted a keyframe at frame 25. This is the length of the animation (how many frames included). When the frames have been selected I selected keyframe 25 and positioned the symbol in the final position in the animation. By clicking on frame 1 I can see the first position of the animation and by clicking on frame 25 I can see the end position. | I will use this within Adobe Flash to help me create animated symbols. I know how to position the symbol to create a motion tween setup. |
29/09/11 | Creating motion tween on timeline Once the start and end positions have been made I created the motion tween. This will create the animation for me, it will fill in the movement between the two frames. To create the tween motion I selected the start and end frame and this highlighted the timeline black. | I will use this tool on the timeline to help create the motion tween. By selecting both of the frames I can easily create the motion tween. |
29/09/11 | This property panel is used for the properties in terms of the motion tween. When both of the frames are selected (start and end), this panel will appear at the bottom of the screen. I selected the Tween: Motion and Rotate: CW, 3 Times. This then created the animation for the stages in between the two selected frames.  | I will be using this property panel when creating my animation. This is because creating a tween animation is an easy way of creating an animation, as the frames in between is calculated for me. |
29/09/11 | Adding shadow to ball  I also added a shadow to the ball in Adobe Flash. I created this shadow by repeating the process of creating the shadow shape by selecting the oval tool. I then imported the shadow symbol into the stage from the library panel. To make the shadow animate with the ball I created a new layer, which can be created along the bottom of the timeline panel. This layer would then appear on the timeline. I then repeated the process of selecting frame 1 and 25 (first and last) and positioning the shadow in first and last position, to create the tween motion. In the property panel (as shown above) I selected the ‘tween motion’ and rotate: None. This shadow would then animate with the ball as the balls shadow. | I would use this tool in future Flash animation work to create two objects in the same animation. I have learnt how to control two timelines for two different symbols and how to combine the two symbols to create one animation. |
Adobe Flash Professional Skills Audit
This is my Skills Audit for Adobe Flash Professional.This is an on-going document and I will be adding to this throughout the process of creating my Animation with Adobe Flash. This will document the skills/ knowledge I have gained and how it will help me in present and future projects.
Subscribe to:
Comments (Atom)